Saturday, September 1, 2012

The last Phases of building the 'Ashley Grey'

The 'Ashley Grey' on her mobile platform, out on my driveway to give me room to  hoist the lug rig sail that I have laced to the spar and lashed to the boom. I have just rigged the mainsheet for the first time..there is a double block attached with a metal bail to the back of the boom. The main sheet has a single block attached to the end by an eye splice. The becket on that single block has a bridle reeved through it which, in turn is attached to each corner brace at the transom. the rig is simple to set up and take down. The main sheet goes from the single block on the bridle up to the double block  at the end of the boom and back to the single block then up to the double block on the boom again. The tiller will fit under the rope bridle, making solo sailing easy (I hope!).
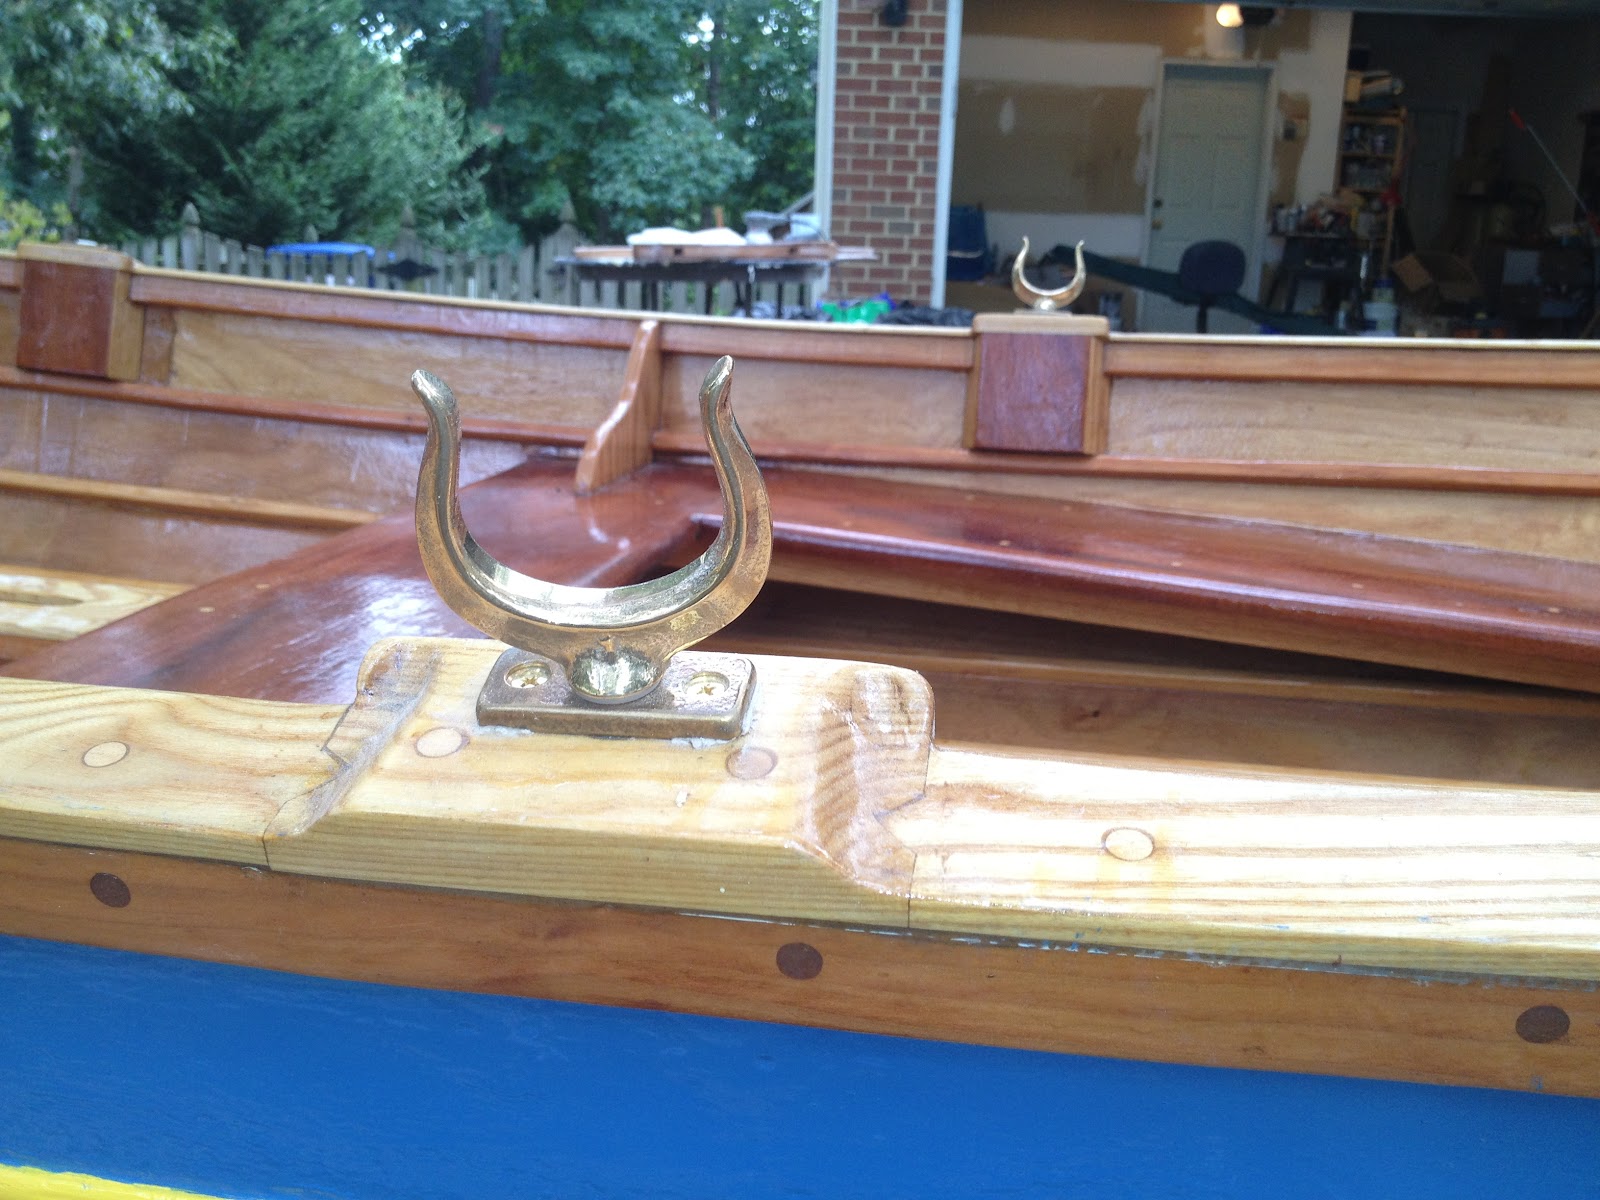
Here are the bronze horn shaped oarlocks purchased fromShaw and Tenney, from whom I  purchase 8 ft. spruce oars(they are beautiful..can't wait to row this boat! The oarlocks fit nicely in the sockets and can be removed when not in use or to move to the other rowing station at the fore thwart.
The 'Ashley Grey' with sail hoisted. I was spendng that day adjusting the lashings and the position of the block on the spar so that the sail will be at an ideal position.
A view of the bow, sail hoisted...the boat looks like it is aching to get in the water like
an Olympic swimmer at the starting block.  We are so close 'Ashley Grey'..so close. Just need to finish the rudder, attach some fittings and assorted hardware  and touch up some of the painted and varnisged areas.
A favorite view of the boat showing the stem, the planks merging into the stem via the gains I cut during the planking process. The fairness of the lines of the boat are shown here nicely, and I am damn proud of those...as Arch Davis, the boat's designer emphasizes, the fairness of a boats 'lines' is what makes or breaks the beauty of the wooden boat. I am so glad Arch convinced me to build this particular boat......I was going to build the 'Laughing Gull' but Arch, despite being very fond of his design 'Laughing Gull' told me that I would enjoy this boat more in terms of the building process itself, its looks and, ultimately, it's performance. While the boat won't be launched for a few more weeks, I can attest to my satisfaction on the first two points.
The centerboard caseis shown, minus the center board. I made the centerboard a little too thick and with the fiberglass on it it was binding when I tried sliding into the down and the back into the raised position. So I took it out and shaved the centerboard down about an eighth of an inch on each side and tapered the edges a little more sharply. I fits and moves perfectly now and I just have to re-apply clear coat and fiberglass to the board. Even though it is thinner, the fiberglass should give it adequate strength while sailing. I still have to install the hooks and get the bungee cords Arch recommends  to hold the board in either the up or down position.  You can see the rear hatch cover is finally installed...I used marine caulking to seal it, 3/8th to 1/2'' stainless wood screws to secure the outer ring. I am glad I opted for the clear removable center cover as opposed to the white one. It is kind of cool to be able to see into the bulkhead compartments.
The main mast fits perfectlyinto the mast partner. The bottom of the mast has a squared of tenon that fits into a square opening I carved out of the inner stem. I found out, just in time, that you are supposed to put a coin of sentimental signigigance in the socket for the tenon at the bottom of the mase. I went to the bank and got a brand new, uncirculated, shiny copper penny, minted in 21012. This sits in the tenon peg hole in penny sized circle I carved out and then coated it all with clear coat epoxy. This is, according to boating folklore, supposed to bring good fortune and happy time to the boat and its owners. It can't hurt! And the boat, no matter what its condition, will always be worth at least a penny!
The jaws of the boom are in position with the sail hoiisted. There are two varnished wooden parrel balls with the parrell  rope threaded through them and thensecured througha blue cam cleat I installed. It holds perfectly. You can see where the sail is lashed to the boom as well.
The afft seat and the main sheet riggging. The bridle line goes through 3/8" holes drilled through the corner braces and then knotted underneath. I need to tighten down the bridle once I have the tiller in place so that the end of the boom is 16" above the tiller.
The halliard line is secured to the wooden cleat on the mast. I put a thin strip of fiberglass with clear coat epoxy on the cleat to strengthen it.
The mast with cleat and boom collar installed.
The boats name, painted on in script with same off white paint used on hull.
I like the yellow trim and wo it contrasts against the blue sheer plank.
This is a block with a spring like mechanism on it, allowing it to be flexible. It is mounted  on the spar, about one third of the length from the front of the spar. The halliard is rove through it and around the mast then lashed to the end of the front of the spar, thus creating a parrell line to hold the spar against the starboard side of mast. It is seceured with lacing rope that go through holes in a baseplate on the blocke and through two holes driled in the spar. It works very well. I could
have screwed the basepate on but was afraide that these could pull loose under high tension or due to breakage of the wood.
Completed rudder case(just needs few coats of varnish, has
tiller inserted .  I used left over 1/8" birch plywood that I had used to make the sheer plank badges
to  "decorate" the upper and lower parts of both sides of the rudder case.


Instead of an all white bulkhead hatch, or all black, I chose, for about the same
price, a hatch that had a clear plastic cover. I used short stainless screws and water proof marine caulking to install the hatcth rings. Do not try to install entire hatch with cover on while using the caulking....even a little of the caulk material will permanently smudge the clear plastic removeable plate. While the fore and
aft bulkheads are there for flotation purposes, I do plan on storing things, like cellphone, wallett, keys
in a plastic bag and then put that in the fore bulkhead and thus protect things of high value.
These bulkheads are not truly meant for storage though.
Rudder and removeable tiller assembly, I was in the process of preparing the pintles and gudgeons the dy I took this photo.
Rudder case showing decorative birch panels that were simply glued on.

Detail of tiller tenon inserted into rudder case opening. PerArch's suggestion, i rounded off the upper and lower parts of the front of the opening to lesson wear and tear on the tiller tenon.
Side view of oak tiller.

Rigged up...almost ready to be launched. I spent a number of days
tampering with the rig in order to figure out how to set it and take it down
efficiently and safely. It got quite easy after I  figured out a routine.
I put more tensionon the boom lashings and slightly altered the position of the spar block
to rid the sail of these wrinkles. I am a bit of a perfectionist...probably why it took me 5 years to build her
I always spent a lot of times thing things through and carefully studying Arch's plans and bookand using
books on wooden sailboat rigs as reference. 
For now, I will accept the fact that when on a starboard tack or broad reach with sail swung to
starboard that the mast will prevent the filling of the upper front corner of the sail. If I find that it really hinders sailing, then I'll probably install a dipping line. 

Starboard view. The centerboard is in the centerboard case as I was trying to
trying to figure out how much length of the centerboard goes below the boat when fully
let down.  I advise that when you make the centerboard, use oak..I used two lengths of red oak surrounding one length
of white oak. I side glued the boards and drilled holes to insert pegs to strengthen the bond. Finally take off enough material on each side of the board so you can apply fiberglass cloth on each side. Remember, the centerboarsgi
must be able to endure high tension and forces without breakage. . Make sure your board doesn't bind either as you move it up or down. Better to know this before you hit the water because the water will cause the wood to swell some.
My youngest son Max, having just graduated as a mechanical
engineer from Virginia Tech, holds the boom on a windy day.
His math and physics skills came in handy  when figuring out
the positioning of items in the rig.
Sail on port side. Mast  and parrell on starboard side. 

Saturday, July 14, 2012

The final touches and rigging of the sail

It's now July 14th, 2012 and the 'Ashley Grey' is just weeks away from being launched. I spent considerable time adding hardware and varnish to the mast, boom and spar. I also fine tuned and fiber glassed the centerboard and refined the outer hull's paint job. I am happy with the off white color of the hull with the
sheer plank painted marine blue and the side molding and badges painted yellow. I painted the name of the boat towards the front, just behind the front badge in off white. I abandoned my original plan of putting the boat's name inside of the transom...who would see it? Most recently I 'bent' the lug sail onto the spar with lacing rope and attached the foot of the sail to the boom both fore and aft with lashings. It was a thrill to raise the sail for the first time and see the spar go to the correct angle and the jaws of the boom come up tight to the mast collar. The halliard was rigged so that it went through the  sheave at the top of the mast went back to a block lashed to the spar and then was wrapped around the mast and tied to the fore end of the spar. The aft part of the boom was rigged by placing a bridle on it with  a double  block attached to it. The main sheet, the line that controls the boom and, hence, the sail, had a single block attached by an eye splice at one end. The becket on this block was rigged to  a bridle, which was simply a line that was rigged across the top of the transom , with enough room for the tiller to emerge beneath beneath it. The mainsheet thus controlled the movement and position of the boom.

Saturday, November 19, 2011

The Sailing Rig

The ' Ashley Grey' with her new mast being prepared and fitted. No varnish on it yet, in this photo,
The boat shown fromthe stern. The transom looks dark because of the shade

The mast being fitted , mast partner not seen as I was in process of making it and had to have mast postitioned perfectly before I could make the partner, which is the structure inside the boate that hods the mast up. The base of he mast has a 1'
square tenon thaat fits in a 1" square hole I carved out of the inner part of the stem. It's hrd to see it, because it is so slight, but there is about a 5 degree rake to the mast, meaning it tilts backwards ever so slightly.
Am now getting the components of the sailing rig finished. I chose a Lug rig because of it's simplicity and ease of set up and take down when out in the water. I am using a tung oil based varnish for the mast, boom and spar and will put on 4 or 5 coats, well buffed between coats. This will give these components a lasting, shiny translucent amber colored finish. Then I'll spread out the sail on the floor and begin lacing it to the spar and mast . The halliard will run through a slot at the top of the mast, inside of which is a sheave. The halliard will be attached to the spar at both ends and then wrapped around the mast aided by a thimble . The spar can then be raised or lowered to set or take down the sail. Pictures of this, once complete will make this easier to understand, but it really is quite simple. The rest of the running rigging is just the main sheet system which I'll describe in my next post. Enjoy these latest photos!

Wednesday, August 24, 2011

Masts, Booms, Spars, the fitting out begins!

I can almost feel the shift of the breeze and hear the snap of the sail as I tack through the Chesapeake during Indian Summer, 2011. I am that close  to putting  the P14 into the water for her maiden voyage.I am currently working on the mast partner, a wooden brace, that will be placed across the front of the boat. It fits just underneath the sheer rail, crossing the boat at a point where the mast will go tthrough a hole in the middle of this structure which I am  fashioning out of red oak. The mast partner  will be screwed, but NOT glued to ledgers made of  1" thick mahogany, left over from the thwarts .  2.5" carriage screws are used for this, so the partner can be taken off, when not sailing, making more room for people to sit towards the front.


The mast is a 12 ' long structure made ut of spruce. I did not make the mast boom or spar. The mast and spar are rounded and long and rqire a high quaax

Thursday, August 18, 2011

Rigging her for a sail!

The manual that Arch Davis supplies to help guide you in the building of the Penobscot 14 does a nice job of describing how to make the mast, boom, and spar for the three rigging choices for this boat. The Gunter rig, which gives you more sail area as there is a jib, looked tempting to me but a bit more complicated to do and, given that I am interested in just relaxing, easygoing sailing, not required for my needs. So I chose the Gunter rig which has a single trapezoidal shaped sail. The beauty of this rig is that the mast does not require wire stays, as does the Gunter, so it is easy to set up quickly and take down quickly, even in open water. In reading how to construct the wooden 12' mast, the boom and spar,I  became convinced that I did not have the right equipment to make these parts adequately, in particular, a quality table saw. So I commissioned Arch to make them for me which turned out to be a wise choice as, for a very fair price, I got the mast(with sheave slot cut out already and sheave hardware to install, as well as hand made wooden halliard cleat attached)), the squared off boom complete with jaws, the spar,. This came perfectly packed by truck with all pieces in perfect and beautiful condition, along with a bag of hardware. I have already done a light sanding on the mast, boom, and spar and next have to remove and glue and screw on the cleat, the jaws, and various other attachments. Once this is done I'll varnish all thre pieces. Seperate to these I received a box from Pope Sails containing the Lug sail, the lacing to attach the sail to the spar, the various ropes to attach the sail to the boom and the haliard. Also, a single block and double block to rig the boom to the main sheet. More on this later with photos, once I get it done.

Saturday, June 25, 2011

The Ashley Grey gets Color!

Boat is still upside down for the painting process. The paint is made by Pettit,a company specializing in marine paints. The boat was first primed with Pettit undercoat and then lightly sanded. The hull, except for the molding, top strake  and rail, is painted a polyurethane topcoat color with the imaginative name 'Off White'.

The molding strip and front and rear badges are painted Interlux polyurethane color called 'Sunburst Yellow. I have always liked the contrast of yellow against blue, and think it really suits a boat. I also wanted a color theme that was similar to the HMS Bounty(see first entry in this BLOG).
Towards the stern, the painted hull is seen, centerboard slot at the top.
You can see the top strake(plank) which is painted a Pettit topcoat polyurethane called 'Ocean Blue'. The photos don't do this color justice. This blue was made for this boat.
The bottom of the boat shown towards the bow, again, the centerboard slot is  seen. There are two coats of paint at this point.

Painting the boat was something I had thought about since it's inception. It seemed that most Penobscots I saw on the internet, including the P14 owned by the designer, Arch Davis, had a white hull. The white does it justice by accenting, through more easily seen shadowing effect on the overlapping planks. I thought long and hard as to whether to use color or just keep it simple and paint everything white. But after much thinking and imagining and playing with colored pencil drawings, I decided on some type of blue for the top strake and bright yellow for the molding and badges. I picked colors off the Pettit color chart on their website, but used Interlux brand for the yellow since the West Marine store had it in stock. It took about 3 weeks to complete the paint job. Incidentally, the transom was not painted, just clear coated and varnished, which gives a nice contrast. The part of the stem that emerges above the breasthook is not yet painted, just primed. I think I will keep it simple and paint that 'Off White' to match the lower hull.


.